icon

Use Source Control When Hiring Freelance Developers!

I see this too often - a directory on a server full of files like …

1
2
3
4
5
main.js
main.js.5.4.2017
main.js.bak
main-old-code.js.bak
previous_site_from_2016/

This is a sign that the developer was scared of thier changes… and they weren’t using any sort of source control system to let them revert their change. A source control system like “git” keeps track of every single line-by-line changes to every file in a project and allows multiple developers to make changes concurrently to the same project.

When I restarted my freelance business I hoped client expectations had moved up to the point where every customer asked for this. I didn’t think clients would still allow a developer to just log directly into their server with SSH or FTP and start pushing files up or editing directly.

Don’t Let Just Anyone SFTP Files Onto Your Server

  • What happens when your web host crashes or has extended downtime? How are you going to deploy your code to another server?
  • What happens if you are hacked? How will you get your site back to a known good clean state?
  • How will you roll back and fix any mistakes or malicious changes?

Doing It Right (It’s Called DevOps)

  1. Go sign up for git hosting at bitbucket or gitlab or pay for a private repo at github.
  2. Then hook it into a continuous deployment system pointed at your web hosting dev site - so that every time code get’s pushed to the master branch that code is deployed to your dev server and it can be reviewed there.
    • Azure Websites has a great hosting setup UI and Continous Integration support from popular Source Control Systems (even dropbox!)

If you’re hiring a freelancer for development, you can probably also find a freelancer to set up the source control repository and continuous deployment if the other developer isn’t comfortable getting it set up.

That way no code can make it onto your server without being stored in a private git repository.

Bonus points: make the developer use environment variables for any api keys or environment specific usernames passwords that the site uses. This way the dev can use dev keys and you keep your production keys private, and they don’t get leaked in the source control system.

icon

Style guides - Documentation or Workbench?

Brad frost has posted something about styleguides that I find really illuminating: http://bradfrost.com/blog/post/the-workshop-and-the-storefront/.

He talks about the difference between the place where you work and iterate to create the output, and the place where you show that ouput off to the users. This seems obvious now that I see it, but it was foggy until now. When we become styleguide producers or design system designers, then we need to think about shifting the process back one more step. Sometimes we produce a system for a large organization (or the public) to use and that sytem has to be really clean and well organized and the documentation needs to thorough, maintainable, attractive and usable. But, we still need a place to build those design components and test them iteratively without commiting everything fully to JS or back-end coding.

The patternlab tool that I grew to love during my first styleguide project has not been the my final choice for the last two style guides. This has been for a couple of reasons, but mainly because I needed something that would integrate tightly with an existing web app codebase. This would help keep the patterns up to date with the actual production code more easily. And one thing I especially love about design systems is that developers can grab a copy of it and do rapid front end dev without needing to run the full development environment and incur the time delay that comes from the extra overhead.

This all leads me to a place where I was creating style guides that are both workshop and storefront in one, they were supposed to be a place for collaboration and iteration amongst developers and designers, but they also needed places for lots of documentation. This lead to a hybrid construct where static documents were being combined with component modification workspaces. On my most recent system the dev team had already built hundreds of React components, and the scss files were being loaded directly in the coponents. Now instead of trying to force them to rearchitect all of their SCSS and make them convert React components into mustache templates for patternlab I looked for ways to convert them automatically. I tried this project on github and I even tried building my own grunt task that could do it, but I realized it was just becoming too disconnected from the original JS codebase. So I went back and found a project called React Styleguidist which they call a “component workbench” (see!) that was just right for that use case, and I was easily able to extend it to serve a custom layout and create extra documentation pages using static markdown files.

So far, combining a “workbench” with a documentation site has actually worked out well for these smaller systems, but I saw immediately what Brad was talking about with the need for separation and abstraction when these systems get bigger and have bigger audiences.

Our understanding of the needs of our users has to shift from the end-user to the internal developer and designer when we make the shift to becomeing system designers. And I encourage you to think about the needs of your users carefully every time you start a new style guide, think about the technical advantages and disadvantages of all the tools out there and dont be afraid to get your hands dirty and create something new and unique for the needs of each company or team.

icon

Returning from our Travels to Nepal

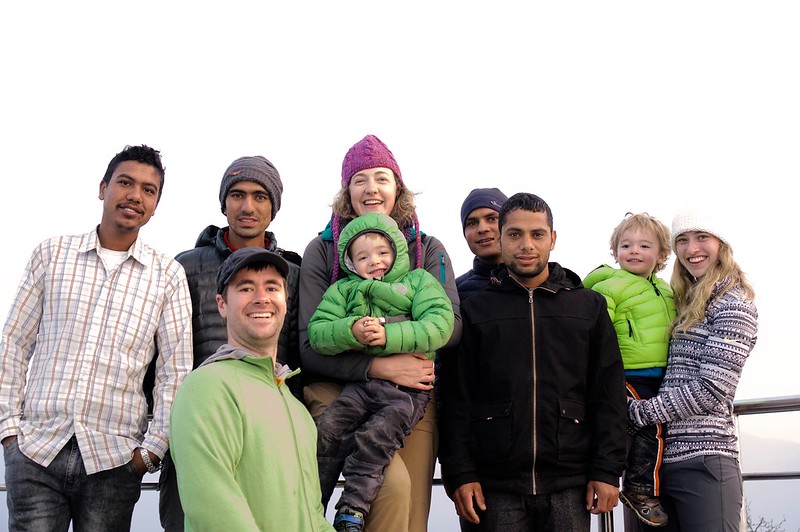
I went to Nepal for 3 months with my wife my two little boys. And, whew what a crazy idea! I had a great opportunity to grow my skills in web UX and share my knowledge and experience with a really cool company there in Kathmandu. This company has been creating economic opportunity in Nepal for years now and they have a pretty impressive engineering department that works on web applications.

The developers I met are super sharp and hard-working, but most of them are recent graduates with a small amount of professional experience. So I got to talk to people and observe and build documents and style guides and just led a hand wherever I could. It seems that people who gain valuable skills and education in Nepal usually leave the country to pursue more lucrative employment elsewhere. Honestly that pattern repeats itself at all levels of the Nepali economy. I believe the internet has made the world smaller, people in developing nations (should) have the same opportunities in the services economy as anyone else. Seeing lots of developers working on a big ambitious project to enable economic job growth right there in their home country was very inspiring.

My family and I also got to do a little sight seeing and even completed a two day trek near the Annapurna range. Riding elephants through the jungle near Chitwan was incredible! Riding a jeep on the rough Nepal highways for hours was… terrible. The most awesome sight was the Himalayas from the air on a short “mountain flight” that brought us right over Mount Everest! It was a great vacation and a great growing experience for all of us.

UX

I especially loved getting to sink my teeth into a UX plan for a “product”. Most of my work has been on a “project” basis up till now. I loved working out user testing and measurement plans with their awesome product managers. Seeing user testing done on functional prototypes was incredibly instructive. I loved outlining a big picture UX maturity model, and the basic plans to implement measurable changes. I also was asked to develop some provisional UX personas for their product and engineering teams. That was a lot of fun.

Personal Challenges

The wonderful chance to work on a fun career opportunity was somewhat balanced by the realities of living in a developing nation with two little kids for so long. We had to keep a close eye on the boys to try to protect them from some of the dangers they weren’t used to. The presence of open sewers and the unpredictable traffic made walking around town an interesting challenge. And our youngest was not quite two years old yet during the trip. We loved the fact hat we lived in such a dense walkable neighborhood, but motivating kids to walk all the time was a constant challenge. Our bodies had to deal with some unusual microbes and parasites, which really pushed my wife’s immune system to the brink.

There’s just a handful of little changes that pile up and make life more stressful than we are accustomed to. We felt that traveling with the kids would be good for our family, and give us all a good perspective on how the rest of the world really lives. I was ready for some career changes already, and this gave me a shove in the right direction. We prayerfully considered what to do before committing to this project, and we knew this was the right thing for our family right now. But, now we have to adjust back to life in the US, and apart from the quiet and cleanliness - now we have to get used to driving more and living so far away from our friends and coffee shops and grocery stores. My career also will need to continue its transition. And that’s frightening, but exciting. For the moment, I am enjoying doing some freelance work from home. More new things await me.

icon

Choosing a Ligthweight Web Framework

I like to do this research from time to time. So here are the results of my latest search for the lightest and most capable framework for building web applications.

CSS Only Minimal Frameworks

  1. basscss 2.13kb gzip
    • rapid prototyping
    • incredibly simple visual style
    • somewhat constrained
    • no buttons, colors or visual appeal
  2. Furtive 2.47kb gzip
    • looks nice
    • includes basscss-like utilities
    • buttons, colors, forms etc
  3. Lotus 2-8k depending
    • small project
    • visually unusual
    • super easy to customize a small build
  4. Milligram 2.3k gzip CSS
    • looks nice - unoffensive but low contrast
    • lacks useful utility classes for padding and margins
    • flexbox percentage based grid
    • built with SASS
    • latest browser versions only
  5. PicnicCSS 7.2k gzip
    • opinionated, applies to default html elements (just use <button>) which seems useful
    • interesting components
    • not a fan of some of the UI choices
  6. Pure 3.8k gzip CSS
    • older project built by Yahoo
    • I still like the visual style
    • no utility classes for padding margin etc
    • can customize the modules you need
    • unique grids! (24ths and 5ths)
  1. Foundation 13.4kb gzip CSS & 27.6k gzip JS
    • SASS modules allow minimizing size by only loading style components you need.
    • complete framework for web development aims to solve a huge variety of problems when building apps
    • requires jquery
  2. Bootstrap 19.7k gzip CSS &9.8k gzip JS
    • most well known framework
    • tons of themes and examples
    • requires jquery
    • v3 offers LESS v4 (still in alpha) offers SCSS
  3. Spectre 10k gzip CSS
    • CSS only but contains many useful elements and widgets
    • good value
    • uses LESS instead of SCSS
  4. Vuetify 42k gzip CSS & 19k gzip JS
    • addon for building apps in vuejs 27.6k gzip JS
    • material design visuals
    • complete component framework including functionality
    • powerful interactivity

Combo Pack

If you find things that you like about several of these framework consider putting them together. Especially with the help of SCSS compilation tools you can build the exact system you need.

If I just want a quick combo of pre-baked frameworks I can try using basscss for layout and utilities and then adding a customized Lotus css that includes [responsive extras, buttons, forms, tables, colors].

That makes roughly 2KB for basscss and then 727 bytes gzipped for Lotus library. Concatenating them together gets you a compressed payload of 2.82kb. You could load the less important one (Lotus) asynchronously so only basscss would be blocking. I mean heck both could be inlined and only increase the html response by 4K leaving lots of room in your HTML payload for more JS and markup.

Icons

Almost every app ends up needing icons. Icon compression varies widely based on browser support. Glyphicons included with bootstrap is between 20 and 40kb.

But, most projects I see end up choosing FontAwesome - The entire fontawesome pack is between 80 and 300kb of fonts and 7k gzip of CSS. That’s a lot of extra weight.

Fontello will let you customize an icon set. A subset of just 18 FontAwesome Icons is less than 10KB of font files and .5k gzip CSS.

Back in my day we used a PNG sprite sheet for each page. And we were happy with our bitmaps! It was a pretty good way of keeping page load times down and displaying your icons, but maintenance was a pain.

Building a JS App

The number of frameworks you can choose for writing a single page application seems to grow at a pretty steady pace. And the popularity of these grows and wanes very quickly.

Here’s a table borrowed from https://gist.github.com/Restuta/cda69e50a853aa64912d which shows where the popular frameworks stand in file size.

Approximations for GZipped versions
Name Size
Ember 2.2.0 111K
Ember 1.13.8 123K
Angular 2 111K
Angular 2 + Rx 143K
Angular 1.4.5 51K
React 0.14.5 + React DOM 40K
React 0.14.5 + React DOM + Redux 42K
React 15.3.0 + React DOM 43K
backbone + underscore + jquery 48.4K
Vue 2.0.3 23K
Inferno 1.2.2 20K
Preact 7.2.0 4K
Mithril 0.2.5 7.8K
HyperApp 0.7.1 1K

Comparing the capabilities of all of these frameworks is beyond the scope of this article. Honestly, the vary significantly. Some of these are scalpels and some are lawn-mowers.

I’ve tried using Mitrhil in a fun project lately and really liked it. You get a lot of power in 8 kilobytes.

icon

Creating a Podcast with Two Hosts

I kept looking and looking for details on how to record two hosts in the same room. But so many of the guides and articles out there are focused on dealing with remotely located hosts. When you want to record audio of two (or more) friends in the same room it’s harder to pin down what you need.

Building a new website

Whenever I launch a new project it’s a chance to try out new technologies. When I just want to build a simple website I have a lot of choices of ways I can make it complicated. The last two sites I’ve built now are both hosted for free through GitLab. They offer a free hosting option for static websites, and they have built in processing pipelines for generating those static sites using systems like Jekyll or Hexo. I’m using Hexo because I’m most familiar with it. It allows me to write posts in plain text files on my computer. It’s an exceptionally fiddly way to set up a blog these days. I don’t recommend it for people who don’t know what most of those things are already. Most people should just start a free wordpress blog or use squarespace I guess.

We host the audio files at SoundCloud because it’s really simple and provides a podcast friendly RSS feed. I’ve already hit their upload quota (3 hours of audio total!?) for free accounts so I need to figure out if I want to start hosting our files on Amazon S3 instead of paying the $7/month for SoundCloud Pro. Which is realy $15/month if you have more than 8 or so episodes (Even “Pro” has a hard limit at 6 hours!)

Recording Hardware

We record the podcast together in the same room looking at each other. We needed our equipment to be compact, portable and cheap. I researched a few different options. One option is to have a single BlueYeti microphone that you place on a table between each host and just talk into it. This has a drawback in that the microphone will be relatively far away from your face and you need to be pretty close to your cohost.

You can also use two devices to record two tracks and then import them into garage band and sync them up. You can use the microphone on your favorite ear-buds if you want. Or you can have each user plug a mic directly into that device.

I decided to use a USB audio interface with two balance connectors and reord two mono tracks into GarageBand on the one main computer. So now I had to choose an audio interface. There are not actually that many options at this price level.

There is a good overview of audio interfaces over at SixColors. He recommends a $120 Tascam interface. Which isn’t bad.

I wanted to go even cheaper so I opted for one he doesn’t even review: the Behringer U-Phoria UMC202HD. It’s half the price of the Tascam option and it’s even cheaper on ebay.

There is one critical problem with this unit, the monitoring chanel is incredibly noisy. Misleadingly bad monitoring which sounded just fine when recorded and played back in Garage Band. So you’ll need to monitor from the laptop, or just skip monitoring alltogether after you establish your levels at the beginning of a recording session.

It’s been rock solid for the few hours of recording we’ve put it through. I set it up easily and I was able to set each stereo channel in GarageBand as a seperate track.

The microphones I opted for was the incredibly cheap Pyle PD58. The 2 I got are fine so far. They are dynamic so they do pretty good in noisy and suboptimal recording environments like we have here. But they require a lot of gain to get decent sound into the computer.

I then grabbed a very cheap folding stand with shock mount and pop filter and I upgraded to some nicer XLR cables that are silicone coated so they are lighter and coil up more compactly in our luggage.

Software

I use Garage Band because it’s free and simple. We record directly into a two track project. I have used many other audio editors that I like better, but this is fine. I use the free tool Audacity sometimes for specific functions like converting a stereo track into mono.

Post-production

I edit the audio minimally in Garage band. This mostly involves tweaking EQ settings and compressors and tweaking volume levels to take out uneven volume problems. I also add on the intro and outro music. Then I select “Save to Disk” from the Share menu and I export the file as a 128kbps mp3 file.

This file does not have all the metadata on it and it’s a little bigger than it needs to be. So I run it through ffmpeg to compress it a bit more. I go down to 96k because 64k is too harsh.

ffmpeg -i "good words 07 hi.mp3" -ab 96k "good words 07 med.mp3"

(you can install ffmpeg on a Mac using brew or just install the GUI app Handbrake)

Then it’s time to add the right metadata, luckily iTunes can do this right out of the box. You simply add your mp3 file to your local iTunes library then right click and “Get Info” now you can use that window to edit all the necessary fields - the first one you will want to change is under the Options tab “Media kind” should be “podcast” - now the fields back on the “Details” tab will be the ones you want. At this point you should also drag your album art onto the generic thumbnail - a simple drag and drop. Use a good quality png file. Mine is 1024px square, which is probably too big because it’s almost a megabyte just by itself.

Currently I then just throw the file up on SoundCloud and let them take care of all hosting and bandwidth and RSS updates.

I followed this guide to set up soundcloud for podcasting.

Those technical tasks are problems I could solve myself for almost free but… I’ve already spent too many hours trying to get that working - and it’s been a pain. I recommend looking into hosting your files on Amazon S3 and configuring your WordPress blog to do the feed generation appropriately.


icon

Family Trekking in Nepal

We took the kids on a short trek in the foothills of the Himalayas this weekend. We had the assistance of some very patient and helpful porters.

We started in Pokhara and went on a two day trek with one overnight in a little lodge up in the mountains. We climbed a long ways and walked for close to 10 miles that first day. The kids were actually pretty good about the whole thing. There were some stressful moments, Andrew (20 months old) tried to run away from us off the side of a cliff or steep staircase several times. Then later he decided he wasn’t going to be carried by the porters at all. So I carried him for a bit longer than I hoped during that day. Really, it was a thrilling and fun experience. We got to see some amazing terrain, and some (distant) really really high mountains in the Annapurna region of the Himalayas.

After we got back from the trek we still had some interesting sight in the city of Pokhara to see. Including a pedestrian suspension bridge, a buddhist monastary and the “World Peace Stupa”. Sadly we did not stay long enough to try Paragliding, but it sure looks like fun.

If you’re interested, we had a good experience with our trekking company Happy Treks. I asked for quotes from several companies and was able to make it a somewhat reasonably cheap and quick family vacation. Our trek was “easy”, we went to Dhampus and then Australian Camp, it ended up being about 3000 ft of altitude gain throughout the trek and then you shed almost all of that on the last leg down. I ended up logging over 24,000 steps on my fitbit each day, so it was pretty intense.

icon

Living in, and Podcasting from Kathmandu

Rebecca and I, and our boys, are traveling and living in Kathmandu, Nepal — until later this spring. It’s an opportunity to travel and experience the world, and see what kinds of things God might have in store for our future. One reason I am excited is because I have met an interesting and inspiring tech company here and talk to local developers about UX and frontend dev practices.

We have even played around with recording podcasts for our friends and family back home.

I’ve taken a break from updating this blog for a long while. There has been way too much that’s happened in my life to even begin unloading it here. Blogging doesn’t feel as safe and fun as it used to. Sometimes I think that it’s too easy to overshare on the internet these days. I have always thought of this blog as an interesting archive of some “snapshots” of my life, but it will never be a complete or accurate picture of me… so what is my blog’s purpose?

So, it’s weird that I’m experimenting with podcasting now. It’s been 12 years since I had my college radio show. But, here we are. Podcasts are pretty fun and a quick way to get a lot of information out quickly to friends and family who want to know what’s going on.

I’ll probably post a new article about the technical details of how we podcast, next.

icon

Serverless Single-Page Applications with Auth0

I am excited about the idea of helping more people become web developers. One way I think that new developers will be able to start learning faster is if they don’t need to deal with servers. So, that’s why I’ve been following the growth of the “serverless architecture” concept lately.

I thought the term “serverless” had a faint smell of BS. I imagine cloud hosting salespeople trying to pry control out of the hands of the “real” developers. But here is the thing, when I am trying to quickly solve a problem, delivery value or build a lean MVP, I don’t want to have to know about any more layers of the system than I absolutely have to.

Data persistence

At the core of most user-facing web applications is reading and writing data to some persistent storage. You might be writing an MVC app and your controllers need to have access to a SQL database for reading and updating the models. Or possibly your are displaying a set of data fetched from an API, either your own or an external service providers.

If you don’t have a “server” to handle passing the right data to the browser and processing the user’s input through business logic.

Imagine you are just having the user’s browser query for data directly based on javascript code running on their computer. The biggest red flag with this idea is that you would have to give the browser some credentials to access the data. You can’t use your master API keys or username and password like you would in server-side code where it’s impossible for a user to see it. Instead you need to send a limited use authentication token that just gives that one browser access to only the records it should be able to access and only the permissions you want them to have (read, add, update, delete). But how do you get that token securely without hosting a server, and without exposing master credentials to the users?

Auth0 and Rules

Auth0 offers something that might help, they are a hosted user authentication service. They can keep a database of all your users for you, or integrate with other identity providers. So when you click “log in” your users are going to their servers and they are sending the user’s browser back to a specific page when they prove they are who they say they are. I have been trying out their email magic links and I think it’s really simple and nice for users to never create, save or remember a password. When a user enters their email address on the sign in form Auth0 immediately sends them an email with a unique token link, clicking that link proves identity and sends them back to my application. Since access to the user’s email inbox is, in reality, a skeleton key that unlocks every account anyway, I think email magic links are the best option.

So anyway, Auth0 has “rules” that you can run when a user successfully authenticates. This is the perfect place to run server-side code to get a one-time key.

For instance Azure Table Storage is a cheap persistence layer very similar to Amazon DynamoDB. I wanted to learn how to use some of these databases because they are an excellent option for a serverless app. With Azure Table Storage you can request a “Shared Access Signature”(SAS) which allows an end user application to work with a limited subset of data. I created a rule in Auth0 that uses my master key to request an SAS that allows full access to records whose “partitionKey” matches the current userId. This newly generated token is passed along to the web application url

HyperDev and Serverless Prototyping

I was a little behind the curve, but I just heard about HyperDev last week. I’ve had a chance to use it a little and it’s a breath of fresh air. If you aren’t aware of the way that web development has been going for the past few years, we are in a precambrian explosion of different tools and frameworks. Each new tool, language, technology adds a new layer of complexity to learn, or evaluate. Beware chasing after the newest thing in programming, though. This process often requires setting up a development environment on your local machine. Setting up dev environments and managing them across applications is a notoriously hard problem. Doing it for the first time is usually frustrating, especially when you’re trying to convince a friend or coworker to try something out.

HyperDev fits into the equation by making it so that you don’t have to download anything, install npm, run any commands from the terminal or even stand up a virtual machine. You can just open the webpage, see all the pertinent code that powers a simple web application, and just make changes. Those changes are applied instantly and your application is available for testing in another tab right away.

Hyperdev

If you need to teach someone the basics of node.js, this is the best way I can imagine doing it. If you want to learn a new front end framework (like I recently did with Vue.js) you can pull open a basic web application with a demo API, and just focus on writing front end javascript and html and css with a zero friction environment, including live-reload. If you know about jsfiddle or CodePen, this is just like that but on steroids.

I’ve tried out Source Lair before and it offers a very similar set of functionality. The only difference is that HyperDev is reaching an educational audience instead of a purely professional audience. And it abandons a lot of the power Source Lair has to make things simple and fast (and free!).


So my idea for future web development projects is to rapidly protoype visual design and UX in a collaborative styleguide based on patternlab and then build out functional prototypes of front end features using hyperdev. Then that front-end code can be pulled into a private repository, the back-end code can be re-deployed on a different hosting environment like Azure Functions, Azure Websites, Amazon AWS Lambda, Heroku etc for future nodejs development. This would leave a place for rapid iterations with the design team, a seperate iteration and collaboration space for front end developers while the back end developers can take the lessons from that prototype and build out a more robust and maintainable applicaiton architecture.

Andrew Walks

I’m very proud of my sons. This little guy has been walking further and further every day. He’s about to make things even more interesting around here.


To view this video please enable JavaScript, and consider upgrading to a web browser
that supports HTML5 video


Racing Quadcopter

I have really started getting into flying remote control quadcopters. I began flying a small toy-sized quadcopter last year, and have been practicing a lot. Getting used to making turns reversed, perfecting smooth and easy circles and figure-eights.

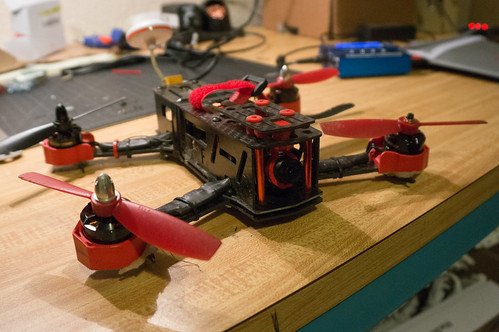
Now a few weeks ago I ordered my first “real” quadcopter. It’s a EF 250 and it was an amazing deal. The prices for real carbon-fiber racing quads has dropped quickly over the past 12 months. And this racing quad is every bit as good as I imagined. This one is 250mm

It is fast (supposedly up to 90mph on a 4S battery), and I’m learning a lot. I can fly with the FPV video goggles and see exactly what the quad is seeing. This is tricky but also makes some aspects of flying easier to manage. I am breaking lots of props, and learning a ton of new things in the process. I’m able to do basic flips and rolls while flying now, which is pretty exciting.

I went out to fly for a little while last weekend with Becca. And we found some beautiful wide open places nearby.

I’m planning on participating in a local race next week. We shall see how that goes. I am looking forward to it, but mostly afraid that I will crash and break my quad beyond repair in the next few days of practice.