Moving into our First Home

This last Friday we closed on our first home. We started looking for a house at the end of last November. Previous to that we lived in a nice little apartment, but that ended with an unpleasant maintenance issue that we tried and failed to resolve with our landlord and his HOA.

So, we moved in with my parents. We were so grateful to have a place to stay, and it worked out really well for us. My parents were not living here in their home for a big chunk of the time we were there, that made things really easy and we saved a lot on rent. I did not enjoy my much longer commute.

So, we searched all over Colorado Springs for a place to call home. God has blessed us with the resources to pay of a lot of debt and even start saving a little money over the last few years. We’ve always enjoyed the simplicity of not having a mortgage, and not having to worry about maintenance tasks or lawn upkeep. But the idea of having a little yard for the boys to go play in, and a place to put a sandbox for them, that sounded really nice.

We eventually found an amazing and unique place up in a little community called Palmer Lake, CO. It’s a beautiful mountain town 15 minutes away from work! The fact that we could afford this modest (by American standards) home was a real surprise. It’s a beautiful location, with amazing mountain views all around us and beautiful little pond nearby. We have a fenced in yard for the kids and a really cool park nearby.

It’s so exciting to get moved in and unload all our stuff from the storage POD. It is incredible to see just how much “stuff” we’ve accumulated again since we had kids immediately after losing it all in the fire 2.5 years ago. So now we are into a new home in a beautiful mountain setting. We are enjoying this new place immensely. It’s special, and I have a ton of geeky projects in mind for it now that I have the freedom to modify and hack this home all I want!

Long term testing results of some favorite clothing

I thought it would be a good time to follow up on this post from 2 years ago.

Wool Stocking Cap

Grade: A

Loved it. It shrunk drastically the first time it went through the wash, now it won’t fit on a baby. Kept me very warm on the top of Long’s Peak last fall.

Ibex Hooded Indie

Grade: C

Owned for 1.5 years. Worn out on the ends of the sleeves quickly. Loved it but a little disappointed on the durability. Probably too light-weight.

Darn Tough Merino Wool Crew Socks

Grade: A+

Still great. Haven’t seen any holes or flaws in any of them wear them for several day at a time. Never smell bad (let them air out overnight). I bought a couple more pairs because I lose socks sometimes.

Merrell Barefoot Style Shoes

Grade: C-

The ones I thought were appropriate to wear to work wore out very quickly. And the ones I have for running are fine, but I just don’t run that often compared to hiking, where I want a more durable and waterproof midtop boot.

Newer Purchases

For my outdoor adventures I wanted somethin like these Synthesis Mid GTX boots from La Sportiva. Yay for GoreTex liners! My feet were the perfect temperature all day on Longs Peak.

This last year I purchased general everyday leather boots The Niners from Woolrich. I had hoped these would be lifetime quality resoleable boots, they are very good. I replaced the laces with ironlaces right away, and the leather is a “Genuine Leather Product” from Horween. Which means it’s not full grain, but honestly they look nice, they are durable and the wear in a way that is very convincingly leather.

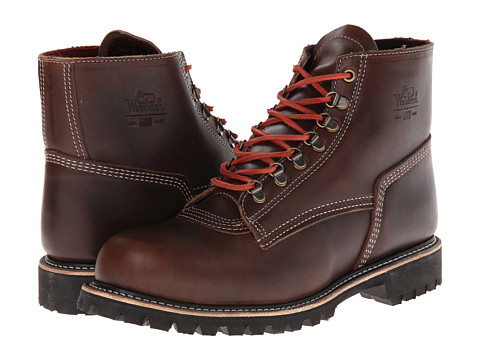
I wear these to work, and on the weekends, in every season. I added Green Superfeet insoles and gave them a coating of Sno-Seal before winter set in. I’ve worn these out in deep snow, while sledding with the kids, and on many long walks. They haven’t reached the 1 year mark even, but they are looking pretty good.

My Photography Organization Process

  • Import photos using Lightroom. Import into local Pictures/YYYY/MM directories
  • Rate and develop photos in Lightroom.
  • Drag finished photos or photos above 3 stars from last import into the ‘rated-for-albums’ publish location, then click Publish (only when on local network with diskstation)
    • diskstation runs the organize script on that folder every hour
    • puts photos in my DS PhotoStation albums
  • choose some of my favorite photos to be sent to flickr photostream for sharing
  • every month or two move all photos from local Pictures/YYYY directory onto an external harddrive.

Migrating to HexoJS

I’m trying out a new blog platform again. Over the last 15(!) years I’ve run this site on a few platforms, including WordPress, Mambo, and ExpressionEngine.

I know WordPress has always served me well. But it was time to try a static blogging platform. Oddly, for the first couple of years I blogged with a static blogging platform. I created posts by adding them to an HTML file. Yes, I was writing raw HTML like an animal. In Notepad++ or Dreamweaver or something like that. So, now we’re back to that level of sophistication, except I don’t repeat myself in the HTML process. Blogging without generator software resulted in manually creating pagination links and an archiving mess.

Hexo takes care of all of that. And even supports importing wordpress posts. When importing the WP XML file Beware of "s in your titles. Those need to be manually removed from the XML file.

INFO 1455 files generated in 28 s

Not bad.

I was able to use my existing Heroku account, and even the same application. Heroku made me upgrade to the latest stack before it would let me deploy (I was still on Cedar 10). I can’t decide if I should deploy with the hexo deploy command or using dropbox integration. I’m going to try the hexo deploy command. It seems like it takes a long time to regenerate because I have 1400 posts in my archive, so that’s not optimal. Oh well, I like learning new ways of doing things, and the ability to write my posts as local markdown text files makes it fit into my existing workflows really well.

PS: My fear of digging into the internals of my wordpress installation for themeing and such was another reason to move to a system that I can understand a little bit better because it is built in node.js.

PPS: Also, the hacky fork of WordPress that I used for… exactly 3 years (What’s up with February!?) to host this blog for free on Heroku started getting pretty far out of date. So here we are.

Plain Text, Tasks, and Menu Bar Notifications

I made a quick spin through my various favorite task management applications again recently. I like experimenting with so many different applications for task management. At different times, I have made workflows around Evernote, Wunderlist, and TheHitList. I covered this over a year ago. For my personal system I keep coming back to plain text .taskapaper files and the Sublime Text Package PlainTasks.

One problem with putting tasks and due dates into plain text files is that it’s hard to get a useful sorted view of all tasks that are due today or overdue, the immediacy of due dates get’s lost in the noise of the lines of text. So I did something about it. I created a menubar application that scans a directory of files for .taskpaper and then compiles a nice list of all your tasks sorted by when they are due.

Get it here: https://github.com/sirtimbly/plaintexttaskmenu

I’m still working on packaging it (which should be simple because it’s all built on Electron) but, for now you can download that github repo, and run electron from your command line locally. It’s been working pretty well for me. My favorite part is that the app actually creates a sorted task-schedule.md and task-schedule.html file in the directory you scanned, so that the sorted task data can be consumed by other scripts and systems, or you can even print your html file each morning if you’re that kind of person.

Wallpaper Wednesday: Autumnal Beauty

Actually, today was the first day of snow in Colorado. All those pretty leaves are long gone now. But, two weeks ago when I took this photo in Gretna, Nebraska it was still the height of autumnal beauty.

DSC02991-thumb

Building websites from scratch with Craft and Inuit

I just built a new website this weekend using two interesting technologies that I really enjoyed. One was Craft CMS which is a powerful CMS that happens to be written in PHP but does not require me to write any of that terrible PHP syntax. It uses the Twig template language, which is nice because my brain has a very easy time parsing it and writing it. Also, Craft was interesting because it came with no template styling out of the box, it was up to me to create my markup and styles from scratch. I loved that.

To generate those styles I tried out Inuit CSS (SASS) Framwork which is a very minimal framework that has almost no visual styling out of the box. I installed their bower components and only activated the few modules I needed and then added my own custom overrides on top of it. It was great. I love working in SCSS, and Inuit was really easy for me to understand since I had already been using the Foundation SASS mixins on other projects. Inuit is similar, just simpler and lighter out of the box. Adding Inuit components requires a trip to the terminal to run bower install blah, so if you’re already comfortable with a bower and SASS workflow I say, try out Inuit. The one Inuit feature I wanted to try out but couldn’t without a paid license is user accounts and registration. If it came to needing user accounts I would be tempted to build a Laravel, ASP.Net MVC or ServiceStack.Net application instead.

From document to website in one day. It’s a neat idea, My process looked like this.

  1. Install Craft locally. I  ran my local Craft website using a pre-built vagrant definition I found on github.
  2. Start with your content. Create your content fields and matrices in the CMS. Import and write your content.
  3. Set up the HTML with semantic markup in the Craft Twig templates.
  4. Create a new site.scss file. Turn on SASS `sass -watch craft/templates/site.scss:public/css/site.css
  5. Install the Inuit Bower Components. Add them to your SCSS file. Turn on the features you want.
  6. Change the baseline size. Develop a color scheme, add color variables in your SASS.
  7. Style the elements of the HTML you already created. Tweak visuals until you’re happy or you run out of time.
  8. Deploy. I deployed my website to Azure websites through a connection to my private BitBucket source control repository.
    It was quick and painless to create a website starting from a document and a few photos. I can see this being a really interesting way to build websites. I like the ease of setup, and the power of creating from scratch. And the knowledge that I didn’t just throw a static html file on a host somewhere, and I didn’t need to install WordPress or develop or buy a WordPress theme.

Wallpaper: Do not conform

DSC02016-Edit-thumb

I started practicing with long exposures of the stars. This is a 30 second exposure from up in the mountains a couple weeks ago, it shows clear trails from star movement throughout the length of time the shutter was open. Still, I am fascinated by this photo and wanted to share it.

Download Wallpaper 2560x1600